

Remote Desktop Connection (Windows)
Remote Desktop Connection can be used by faculty and staff to remotely access a campus Windows computer from a different Windows computer. This first requires that the campus computer be set up to allow remote connections through the firewall.
Instructions for remoting into a campus Windows computer using a Mac.
If you require assistance or have any questions, please contact the IT Service Desk.
First Set Up Your Campus Computer:
(the computer that will be remoted into)
These steps need administrator privileges which may require you to contact your CTC or the IT Service Desk.
- Click the Start button, then search for Firewall and open Allow an app through Windows Firewall.

- Click the Change Settings button and then scroll down in the list to Remote Desktop.
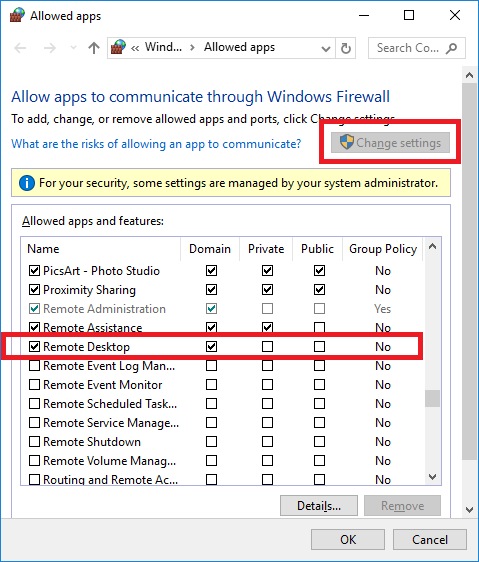
- Place a check mark next to Remote Desktop under the Domain column and click OK to close the window.
- If the user account being used to remote in does not have Administrator privileges on the computer, then the account will need to be added to the Remote Desktop Users computer group:
- Click the Windows button to open the Start Menu, then search for and open the Computer Management application.

- In the first menu in the left pane, navigate to Local Users and Groups, then Groups, and then select the Remote Desktop Users group.
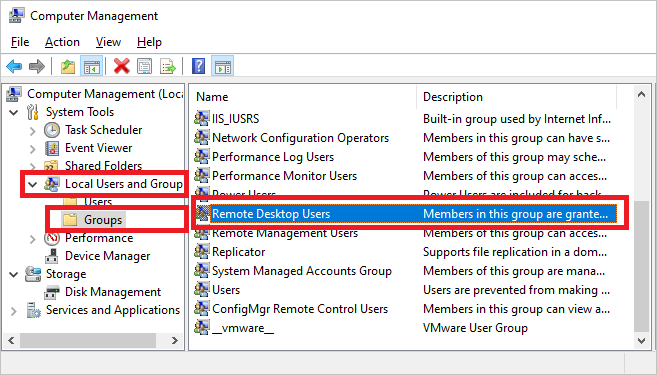
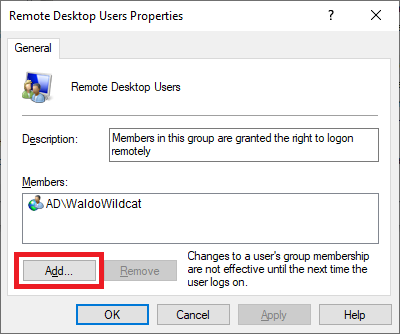
- Click the Add button.
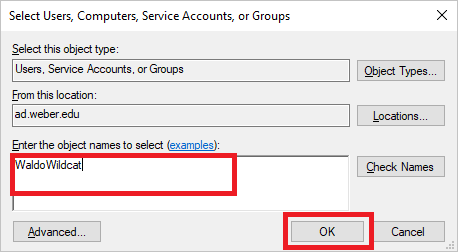
- In the "Enter the object names to select" field, enter the account username and click OK.
- Click OK in the Remote Desktop Users Properties window, then close the Computer Management window.
- Click the Windows button to open the Start Menu, then search for and open the Computer Management application.
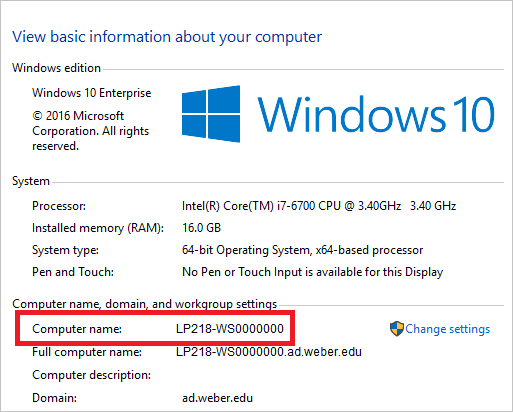
- Note the name of your campus computer:
- For Windows 7, click Start then right-click Computer and select Properties.
- For Windows 8.1/10, right-click the Start button then select System.
- Note your Computer Name (e.g. LP218-WS0000000):
- In certain circumstances, you may run into issues where the Remote Desktop settings are conflicting with what is shown in Control Panel. If after following the aforementioned steps you are still unable to remotely connect, check the following setting located by going to Settings, then System, then Enable Remote Desktop. If the setting is turned off, you will need to log in to an Administrator profile to turn this setting on.
.png)
Next Use Remote Desktop Connection from a Different Computer:
(the computer that will be used to remotely access your campus computer)
If you are remoting in from an off-campus location, you must first successfully establish a WSU VPN connection.
- Click the Start button, then search for Remote and open Remote Desktop Connection.

- Click the Show Options button then enter in the following information:
- Computer: Enter your computer name (from step 4 above) suffixed by .users.weber.edu (e.g. LP218-WS0000000.users.weber.edu)
- User name: Enter ad\ then your Weber username (e.g. ad\WaldoWildcat)
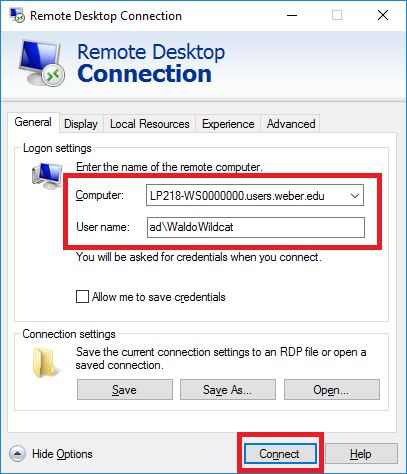
- Click the Connect button
- In the popup window, enter your Weber password and click OK.
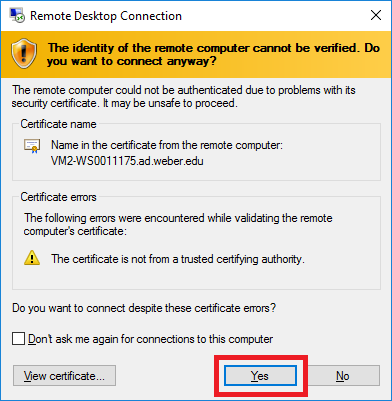
- If a certificate prompt appears, click Yes.
- You should now be remotely connected to your campus computer.
While using WSU's network services, users are subject to WSU's Acceptable Use Policy for Computing and Network Resources (PPM 10-2). Violation of this policy may result in a user's network access being suspended. Note that any sort of peer-to-peer (P2P) connection is strictly prohibited while on campus (Torrents, Limewire, etc.).